There’s nothing more Christmas than enjoying a warm drink and some home-baked cookies. However, no one hates homemade cookies at a tailgate either. So we thought this year, we’d celebrate the holidays with some tailgating food turned into a Christmas treat. Whether you’re looking for something to make for your tailgating team for the holidays or have a cookie exchange coming up, we’ve got you covered with some tasty cookies. Here are our 12 favorite tailgating cookie recipes, one for each of the days of Christmas.
trending food and drink recipes
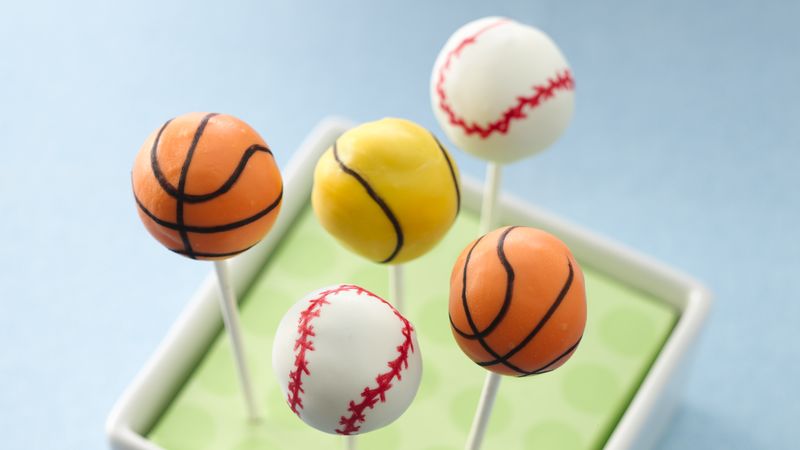
1. Sports-Themed Cake Pops
Ingredients
Cake
- 1 Cup All-Purpose Flour
- 1/2 Tsp Baking Soda
- 1/2 Tsp Baking Powder
- 1/4 Tsp Salt
- 3/4 Cup Granulated Sugar
- 1/4 Cup Butter, softened
- 1/2 Cup Sour Cream
- 2 Egg Whites
- 1 Tsp Vanilla
- 1/4 Cup Milk
Filling
- 2 Cups Powdered Sugar
- 3 Tbsp Butter, softened
- 1 Tbsp Milk
- 1 Tsp Vanilla
- 8 Creme-Filled Chocolate Sandwich Cookies, coarsely crushed
Coating And Decorations
- 28 Paper Lollipop Sticks (6 inch)
- 2 Styrofoam Blocks
- 2 Bags (12 oz each) Candy Melts of any color
- Icing Writer
Instructions
- Heat oven to 350°F. Grease 8- or 9-inch round pan with shortening; lightly flour. In medium bowl, mix flour, baking soda, baking powder and salt; set aside.
- In large bowl, beat granulated sugar and 1/4 butter with electric mixer on medium speed about 2 minutes or until light and fluffy, scraping bowl occasionally. Beat in sour cream. Beat in egg whites, one at a time, beating well after each addition. Beat in 1 teaspoon vanilla. On low speed, alternately add flour mixture, about 1/3 at a time, and milk, about 1/2 at a time, beating just until blended. Pour into pan.
- Bake 33 to 38 minutes or until top springs back when touched lightly in center. Cool 15 minutes.
- Meanwhile, in medium bowl, mix powdered sugar and 3 tablespoons butter with electric mixer on low speed until blended. Beat in 1 tablespoon milk and 1 teaspoon vanilla. Crumble warm cake into medium bowl. Stir powdered sugar mixture into crumbled cake until well blended. Stir in crushed cookies. Cover; refrigerate 1 to 2 hours or until firm enough to shape. Roll cake mixture into 28 (1 1/2-inch) balls; place on waxed paper-lined cookie sheet. Freeze 30 minutes.
- In 2-cup microwavable measuring cup, microwave 12 oz of the candy melts as directed on package until melted. Coating must be at least 3 inches deep; add more candy melts as necessary to reach and/or maintain 3-inch depth. Remove several cake balls from freezer at a time. To make each cake pop, dip tip of lollipop stick 1/2 inch into melted candy and insert 1 inch into cake ball. Dip into melted candy to cover; very gently tap off excess. (Reheat candy in microwave or add vegetable oil if too thick to coat.) Poke opposite end of stick into foam block. With icing writer, decorate cake pops to resemble desired sports balls. Let stand until set.
Notes
Though not exactly a cookie, these unusual cake pops from Betty Crocker actually use crushed cookies. They are ideal for a cookie exchange and a great addition to your tailgating food spread. The best part is the recipe is really flexible. You can use any cookies you and your team enjoy and you can decorate them for any sport. You can also add a few red and green elements to make them more festive.

2. Ice Sports Jersey Cookies
Ingredients
Cookies
- 1 1/2 Cup Powdered Sugar
- 1 Cup Unsalted Butter, softened
- 1 Tsp Pure Vanilla Extract
- 1/2 Tsp Almond Extract
- 1 Large Egg
- 2 1/2 Cups All-Purpose Flour
- 2 Tsp Baking Powder
- Cookie Cutters
Icing
- 4 Cups Powdered Sugar
- 3 Tbsp Meringue Powder
- 1/3 Cup Water
- Food Coloring, optional
Instructions
- Mix powdered sugar, butter, vanilla, almond extract and egg in large mixing bowl. Sift flour and baking powder over the wet ingredients and mix just until combined. Cover and refrigerate the dough at least 1 hour.
- Preheat oven to 375 degrees and line a cookie sheet with parchment paper. Remove dough from the fridge and roll out on a lightly floured surface, using only as much flour as needed to prevent sticking. Roll the dough to ¼” thick and cut as many cookies as possible from the dough, dipping the cookie cutter into flour between each cut.
- Transfer the cutout cookies to prepared cookie sheets, spaced at least 1″ apart. Collect the scraps of dough and re-roll until all the dough has been cut into shapes.
- Bake cookies 7–8 minutes then let cool. While the cookies are cooling, stir together the ingredients for the icing.
- In a large bowl or the bowl of an electric mixer fitted with paddle attachment, add powdered sugar and meringue powder. Begin mixing on low speed then add water. Beat icing on low speed 7–8 minutes or until it begins to hold peaks then add to piping bag. This will be used to outline the cookies. It’s important that it be a thick consistency to hold its shape when piped onto the cookie. Cover icing that’s not being used with a damp towel at all times.
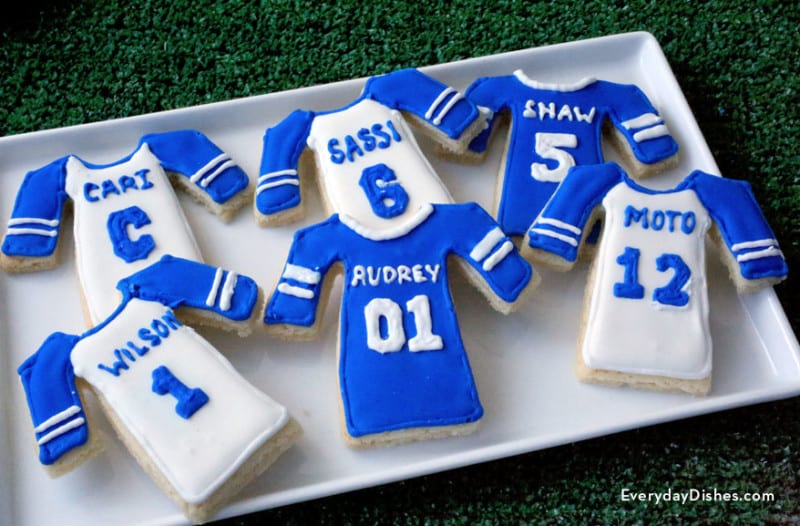
- Outline jersey cookie with icing. Allow the outline icing to dry.
- After cookies have all been outlined, add a few drops of water to remaining icing to create your flood icing. This will have a slightly thinner consistency, flowing easily when moved with tip of icing bag and the surface should quickly smooth itself out and not hold marks. Fill all outlined areas with the flood icing and allow them to dry completely.
- Use any remaining icing to decorate the jersey with lines, numbers and names.
Notes
If you love making cookies to give as a gift, these sports jerseys are a great option. They can be fully customized and decorated in any team colors. You can also write people’s names and give them a number. If you want to make them more Christmas-themed, use red and green frosting. You can also put Santa, Rudolf, or any of your favorite Christmas character names on them. Decorating cookies can be challenging, but this recipe is great for beginners.
3. Medal Cookies

Ingredients
Ingredients
- 140 Grams Butter
- 100 Grams Light Soft Brown Sugar
- 3 Tbsp Golden Syrup
- 1/2 Tsp Vanilla Extract
- 350 Grams Plain Flour, plus extra for dusting
- 1 Tsp Bicarbonate Of Soda
- 1 Large Egg
To Decorate
- 1 Kg Pack Ready-To-Roll Icing
- Icing Sugar
- Food Coloring Paste, Edible Glitter, Icing Pens (optional)
- 15 Long Colorful Ribbons
Instructions
- Heat oven to 200C/180C fan/gas 6. Line 2 baking trays with baking parchment. Melt the butter, sugar and syrup in a small saucepan. Mix in the vanilla, remove from the heat and leave to cool for 10 mins.
- Sieve the flour and bicarbonate of soda into a bowl. Pour in the melted butter mixture and the egg, and stir together to form a stiff-ish dough. Pop the dough in the fridge for 10 mins to chill and firm up.
- Roll the dough out on a floured surface to 5mm thick, then stamp out 15 circles using a 7.5cm round cookie cutter; you may need to re-roll the trimmings to get 15 cookies. Make a hole at the top of each circle with the end of a pencil.
- Place on the baking trays and bake for 12 mins until golden, swapping the trays around halfway through. Cool on a wire rack. Decorate the cookies (see below), making sure the hole is at the top of each one. Will keep for 3 days in an airtight container.
Notes
Do you and your Christmas team play games during the holidays? Do you need something to award the winners? These medal cookies are the perfect option. Made with decorated biscuits, these cookies are strung on ribbons and look just like Olympic medals. They can be decorated to match any theme and are a tasty way to celebrate any victory.
4. Football Cookies
Ingredients
- 2 1/4 Cups All-Purpose Flour
- 1/2 Tsp Baking Powder
- 1/4 Tsp Salt
- 3/4 Cup Unsalted Butter, softened to room temperature
- 3/4 Cup Granulated Sugar
- 1 Large Egg
- 2 Tsp Pure Vanilla Extract
- 1/4 – 1/2 Tsp Almond Extract
- Royal Icing
Instructions
- Whisk the flour, baking powder, and salt together in a medium bowl. Set aside.
- In a large bowl using a hand mixer or a stand mixer fitted with a paddle attachment, beat the butter and sugar together on high speed until completely smooth and creamy, about 2 minutes. Add the egg, vanilla, and almond extract (if using) and beat on high speed until combined, about 1 minute. Scrape down the sides and up the bottom of the bowl and beat again as needed to combine.
- Add the dry ingredients to the wet ingredients and mix on low until combined. If the dough seems too soft, you can add 1 Tablespoon more flour until it is a better consistency for rolling.
- Divide the dough into 2 equal parts. Roll each portion out onto a piece of parchment paper or a lightly floured silicone baking mat (I prefer the nonstick silicone mat) to about 1/4-inch thickness. The rolled-out dough can be any shape, as long as it is evenly 1/4-inch thick.
- Stack the pieces, with parchment paper between the two, onto a baking sheet and refrigerate for at least 1-2 hours and up to 2 days. If chilling for more than a couple hours, cover the top dough piece with a single piece of parchment paper.
- Once chilled, preheat oven to 350°F (177°C). Line 2 large baking sheets with parchment paper or silicone baking mats. Remove one of the dough pieces from the refrigerator and cut into shapes with cookie cutter(s). Re-roll the remaining dough and continue cutting until all is used. Repeat with 2nd dough piece.
- Arrange cookies on baking sheets 3 inches apart. Bake for 11-12 minutes, until lightly browned around the edges. Make sure you rotate the baking sheet halfway through bake time. Allow cookies to cool on the baking sheet for 5 minutes then transfer to a wire rack to cool completely before decorating. I like to decorate cookies directly on baking sheets so I can stick the entire baking sheet in the refrigerator to help set the icing. So place the cooled cookies back on baking sheets.
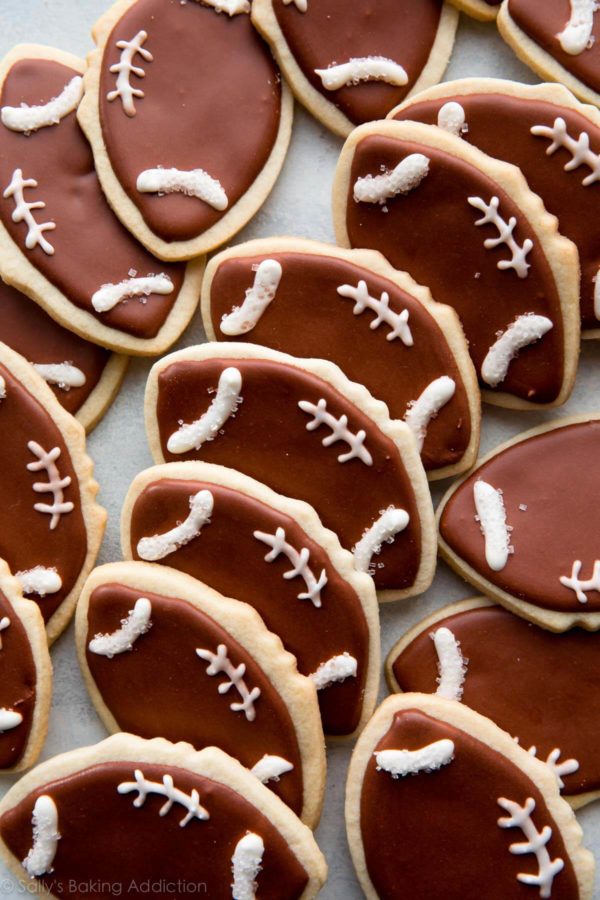
- Decorate: Prepare royal icing. Spoon 1/2 cup of it into a separate bowl. This icing will remain white. Tint the rest of the icing brown. I used 3 drops to get this shade of brown. Using Wilton piping tip #5 or piping tip #4, outline and flood with brown. Allow icing to set (I place the cookies in the fridge so the icing sets quicker!). Using piping tip #2 or piping tip #3, pipe the white laces/lines on top. Sprinkle with coarse sugar, if desired. Allow white icing to set.
- Enjoy cookies right away or wait until the icing sets to serve them. Once the icing has set, these cookies are great for gifting or for sending. Plain or decorated cookies stay soft for about 5 days when covered tightly at room temperature. For longer storage, cover and refrigerate for up to 10 days.
Notes
Don’t put the piping bag away just yet. You’ll definitely want to whip up these football cookies. Don’t worry if you aren’t a decorator, these piped football cookies are super easy to make. They are simple sugar cookies cut out like a football and decorated with brown and white frosting. They’re tasty and impressive when served to your tailgating guests.
5. Reese’s Stuffed Football Cookies
Ingredients
- 3/4 Cup Butter or Margarine, softened
- 1/2 Cup Sugar
- 1 Egg
- 2 Tsp Vanilla Extract
- 2 1/2 Tsp All-Purpose Flour
- 1/4 Cup Hershey’s Dark Cocoa
- 1/2 Tsp Baking Powder
- 1/2 Tsp Salt
- 36 Reese’s Peanut Butter Mini Cups
- 1/2 Cup White Ready To Spread Frosting
Instructions
- Heat oven to 350°F. Beat butter and sugar until creamy. Add egg and vanilla. Stir together flour, cocoa, baking powder and salt; gradually add to butter mixture.
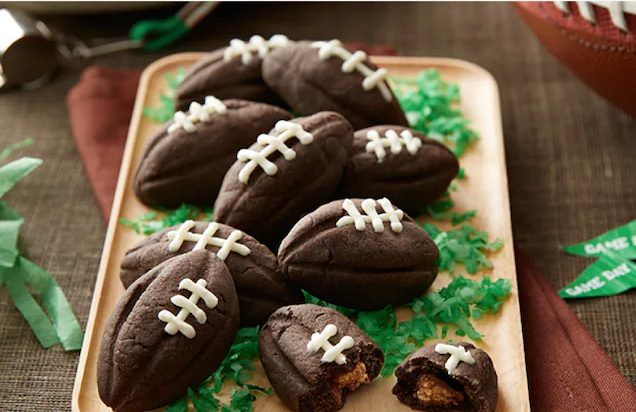
- For each cookie roll about 1 tablespoon dough into ball; flatten slightly and press around one mini peanut butter cup, covering cup completely. Mold into football shape. Using wooden pick or edge of knife press lines into dough resembling lacing on football. Place on ungreased cookie sheet.
- Bake 12 to 14 minutes or until set. Remove from cookie sheet to wire rack. Cool completely. Fill in football lacing marks with frosting, if desired.
Notes
Is there anything more fun than biting into a cookie and finding a surprise center? These football-shaped chocolate cookies are made with Reese’s peanut butter cup minis. On the outside, they are just cute football cookies, but on the inside, there’s a delicious peanut butter treat waiting. They’re sure to impress at both your cookie exchange and your tailgating parties.
6. Football Cookie Bars
Ingredients
- 2/3 Cup Unsalted Butter, softened
- 2 Cups Packed Brown Sugar
- 3 Large Eggs
- 1 Tsp Vanilla Extract
- 2 3/4 Cups All-Purpose Flour
- 2 Tsp Baking Powder
- 1/2 Tsp Baking Soda
- 1 Tsp Salt
For The Topping
- 3/4 Cup Chocolate Chips
- 3 Tbsp Heavy Cream
- 1/4 White Chocolate Melting Wafers
Instructions
- Preheat oven to 350 degrees. Line a 9×13 pan with foil and spray it with nonstick baking spray.
- Beat the butter and sugar until creamy. Add the eggs and vanilla and beat again.
- Stir together the flour, baking powder, and salt and slowly add to the butter mixture until a soft thick dough forms. Spread the mixture in the prepared pan.
- Bake for 30 minutes. Do not over bake. Remove and let cool completely. Lift the bars out of the pan using the edges of the foil.
- Place the chocolate chips and heavy cream in a microwave safe bowl and heat for 30 seconds. Stir until melted and creamy. Spread on top of the bars evenly and let set. Cut into 30 bars.
- Melt the white chocolate melting wafers according to the package directions. Let cool slightly.
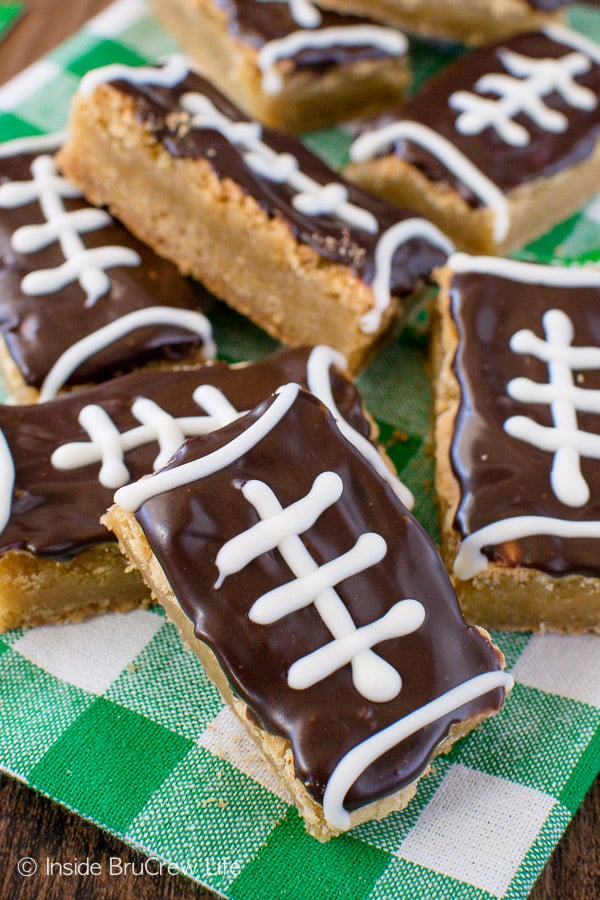
- Spoon the melted chocolate into a ziplock baggie and cut one tip off. Pipe “laces” onto the bars, so they resemble footballs. Let set. Store in a tightly sealed container.
Notes
We love cookie bars. They are so easy to prepare and can be made in a pinch. These simple cookie bars are smothered in chocolate and decorated to look like footballs. We love this recipe for beginners looking to impress, but also it’s a great option for any time of year.
7. Chocolate Shortbread Thumbprint Cookies
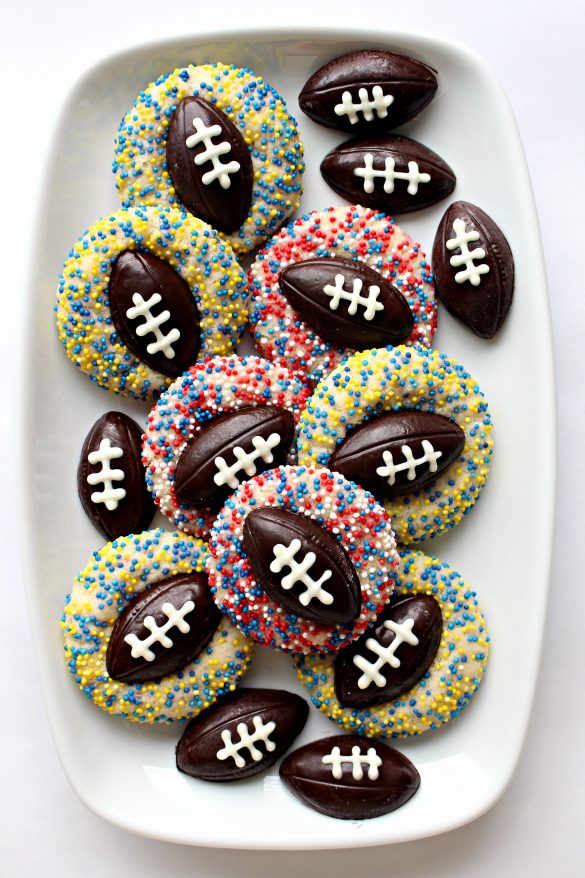
Ingredients
Cookies
- 1 Cup Unsalted Butter, room temperature
- 2/3 Cup Granulated Sugar
- 2 Tsp Vanilla Extract
- 2 Cups All-Purpose Flour
- 1/2 Cup Nonpareil Sprinkles
Chocolate Footballs
- 1 1/2 Cups Dark or Milk Melting Chocolate
- 1/2 Cup White Melting Chocolate
Instructions
Chocolate Footballs
- Melt chocolate in a double boiler or in the microwave at 50% power. Transfer the melted chocolate into a disposable piping bag. Pipe the chocolate into the football mold cavities. Carefully, tap the mold on the counter to release any trapped air bubbles.
- Refrigerate the filled mold for 5-10 minutes until the chocolate has firmed. Remove from the fridge. Turn over the mold and tap on the counter to release the chocolate footballs.
- Melt white chocolate in a double boiler or in the microwave at 50% power. Transfer the melted chocolate into a disposable piping bag with a #2 small round tip. If using a plastic bag or if no piping tip is available, snip a tiny corner off the bag to pipe through instead. Pipe laces onto the chocolate footballs.
- Refrigerate the footballs for about 5 minutes until the white chocolate is firm.
Cookies
- Preheat oven to 350° F. Line a baking sheet with parchment paper. Pour the nonpareil sprinkles into a shallow bowl.
- In the bowl of an electric mixer, cream together the butter, sugar, and vanilla.
- Add the flour and beat just until combined.
- Use a small (1 tablespoon) scoop to portion the dough. Roll each portion into a ball and roll the dough ball in the nonpareil sprinkles to cover completely.
- Place the sprinkle coated dough balls on the prepared baking sheet about two inches apart.
- Remove from the refrigerator and bake for 10-12 minutes.
- Remove from the refrigerator and bake for 10-12 minutes.
- While the cookies are baking, place the chocolate footballs in the freezer. Chilling the chocolate will keep it from quickly melting when placed on the hot cookies.
- Remove the cookies from the oven and allow to cool for about 2 minutes. The top of the cookies will still be light and the bottom should be just turning golden.
- Take the chocolate footballs out of the freezer and gently press one onto each cookie.
- Transfer the cookies onto a cutting board or platter and refrigerate for 20-30 minutes to keep the chocolate from melting while the cookie cools.
- When the cookies are cool and the chocolate is firm, store the cookies at room temperature in an airtight container for up to two weeks.
Notes
Chocolate shortbread thumbprints are a must-have at any Christmas cookie exchange party. This recipe takes these crowd favorite cookies one step further and makes them football-themed. By using football-shaped chocolates instead of chocolate pastilles or jam, they become adorable sports-themed cookies. Just add a little icing for the laces and you’re ready to serve these adorable treats!
8. Nutter Butter Basket In A Net
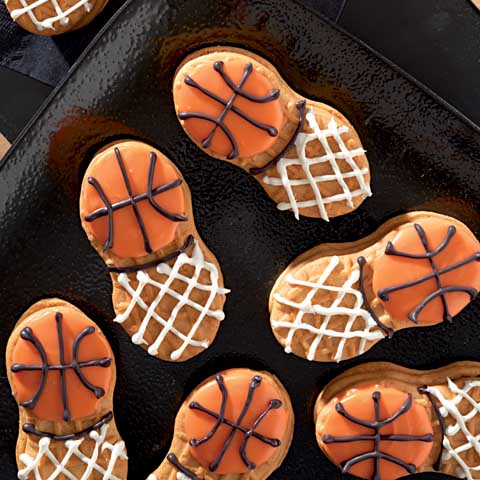
Ingredients
- 4 Oz Orange Candy Coating Wafers
- 1 Tsp Oil
- 16 Nutter Butter Cookies
- 1 Oz Black Candy Coating Wagers
- 2 Oz White Candy Coating Wafers
Instructions
- Microwave orange candy coating wafers and oil in microwaveable bowl on HIGH 1 min.; stir until wafers are completely melted. Spoon into piping bag; cut small piece off tip.
- Use to pipe circle onto half of each cookie; spread to fill in circle with even layer of orange coating. Place on baking sheet. Gently tap baking sheet on counter to even out layers of coating.
- Microwave black candy coating wafers in separate microwaveable bowl 1 min.; stir until melted. Spoon into separate piping bag; cut off tip, then use to draw lines on orange circles to resemble basketballs as shown in photo. Use remaining black candy coating to pipe line under each ball for the rim of the basketball net.
- Repeat to melt white candy coating wafers; use to add netting for the basketball hoops as shown in photo. Let stand 10 min. or until firm.
Notes
At first glance, these cookies look incredibly impressive. However, they’re actually very easy to make because they are simply decorated Nutter Butters. To make them you’ll just need a package of Nutter Butters, some orange, white, and black colored candy coating, and a piping bag. Then you’ll make a basketball on one end and a hoop on the other. Perfect for if you’re in a hurry.
9. Basketball Oreo Cookie Pops
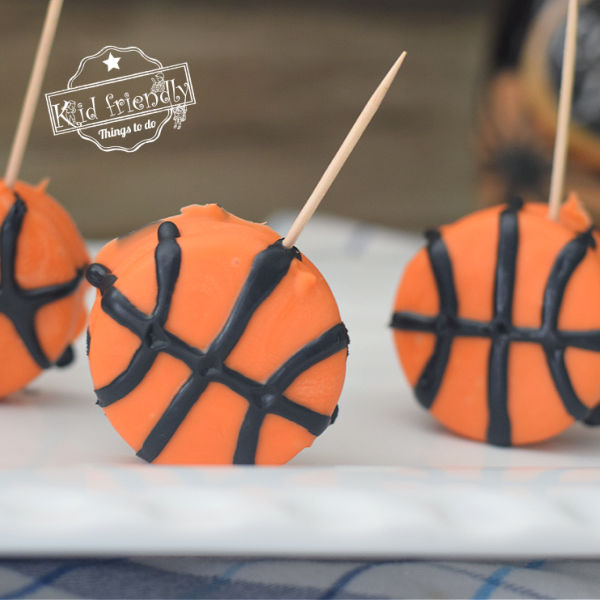
Ingredients
- Orange Chocolate Melts
- Black Icing
- Oreo Cookies
- Toothpicks
Instructions
- Melt your chocolate in a small microwave-proof glass bowl – according to the package directions
- Drop a cookie in
- Dip the cookie or turn them over to coat both sides
- Pull the cookie out with a fork, tapping off the excess chocolate, and slide It onto the wax paper to dry
- Repeat with the other cookies
- After the chocolate dries you can start decorating them with the black icing
- *If you intend on inserting toothpicks, then you can insert them now
- While the cookie is still flat on the wax paper, make a Cross with the black decorating icing
- Then add the semi-circle shapes to each side
- Let dry
- If you used toothpicks then you can stand the cookies up or leaven them flat on the platter
Notes
Another easy-to-make cookie are these Oreo cookie pops. Decorated to look like basketballs, these sports-themed cookies are also super easy to make. You take Oreos right from the package, dip them in orange-colored candy coating and decorate with chocolate stripes. If you’re not a basketball fan, you can also turn these into baseballs, tennis balls, or soccer balls. No matter what you make, everyone will love them.
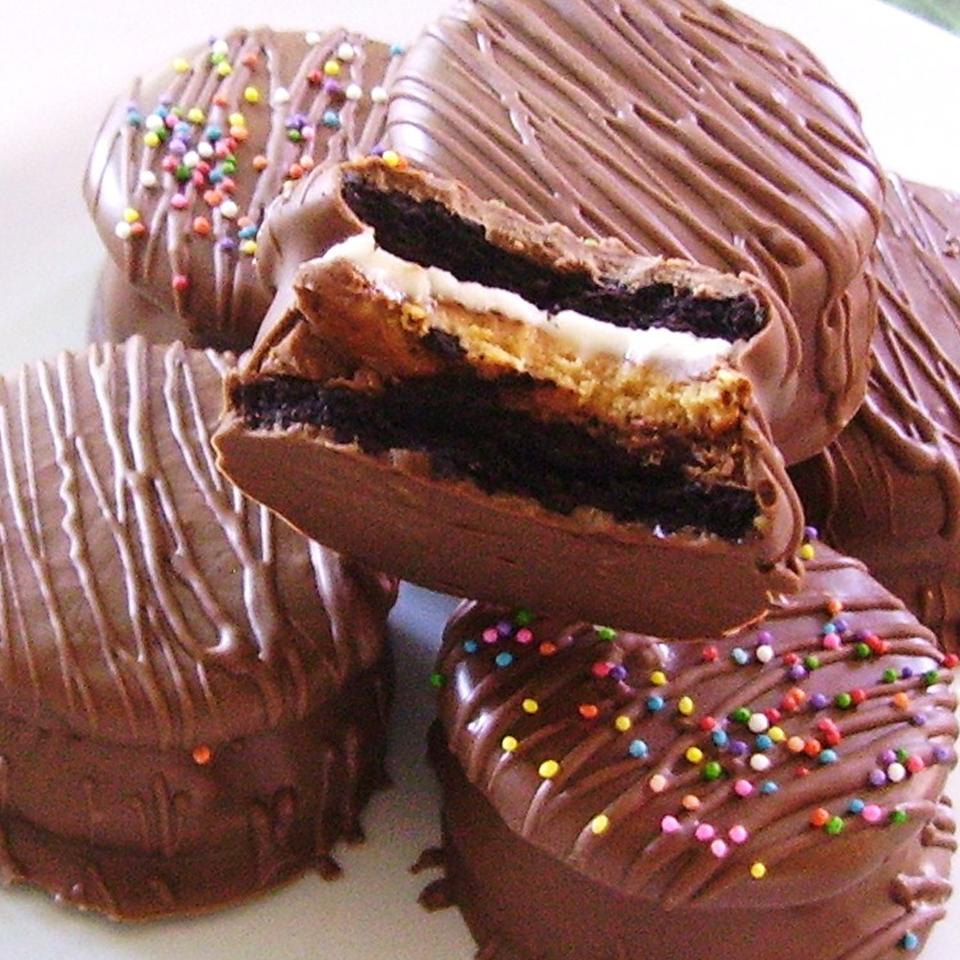
10. Chocolate Hockey Pucks
Ingredients
- 16 Chocolate Sandwich Cookies (such as Oreo)
- 16 Chocolate Covered Peanut Butter Cups (such as Reese’s)
- 12 Oz Semi-Sweet Chocolate Chips
- 2 Tbsp Shortening
Instructions
- Line a baking sheet with waxed paper.
- Split each sandwich cookie open using a paring knife, putting as much filling as possible on one side of the cookie. Arrange cookies on a microwave-safe plate. Place 1 peanut butter cup on the filling-side of each cookie; cover with the remaining cookie top.
- Heat cookie sandwiches in the microwave until chocolate is slightly softened, about 5 seconds. Press cookie sandwich firmly together to adhere both sides of the cookie to the peanut butter cup.
- Heat cookie sandwiches in the microwave until chocolate is slightly softened, about 5 seconds. Press cookie sandwich firmly together to adhere both sides of the cookie to the peanut butter cup.
- Dip each cookie sandwich in the melted chocolate mixture, completely covering in chocolate. Allow excess to drip off before placing on waxed paper-lined baking sheet. Hide any finger prints on the cookies with extra melted chocolate. Freeze the ‘hockey pucks’ until chocolate is hardened, at least 30 minutes.
Notes
Now if you are really looking for something decadent to add to your holiday lineup, look no further. These chocolate hockey pucks are made by layering Oreos and Reese’s peanut butter cups. They are then dipped in chocolate and covered in sprinkles. The result is a cookie that looks just like a hockey puck. Perfect to serve at Christmas or as part of your winter tailgating food spread.
11. White Chocolate Baseball Cookies Filled With Peanut Butter Fudge
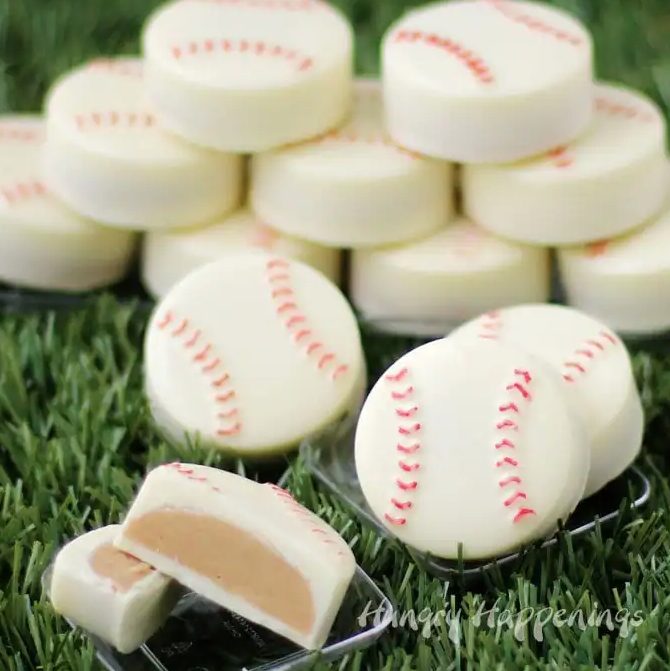
Ingredients
Peanut Butter Fudge Filing
- 8 Oz White Confectionery Coating or White Chips
- 4 Oz Peanut Butter Chips
- 8 Oz Creamy Peanut Butter
- Pinch of Salt
White Chocolate
- 18 Oz Melted and Tempered Pure White Chocolate or Melted Candy Melts
- Red Food Coloring Marker
Instructions
Peanut Butter Fudge Filing
- Combine white confectionery coating and peanut butter chips in a microwave safe bowl.
- Heat on high power for 30 second increments, stirring after each, until melted.
- Stir in peanut butter and pinch of salt until well combined.
- Allow to cool slightly before pouring into your white chocolate shells.
White Chocolate
- Spoon about a tablespoon of white chocolate into each baseball mold and brush it up the sides.
- Refrigerate (or freeze if using candy melts) for about 5 minutes until it sets.
- Fill each mold with fudge and chill until set.
- Top with a thin coating of white chocolate and chill until set.
- Draw on details using a red food coloring marker.
Notes
White chocolate and peanut butter fudge is definitely one of our favorite cookie combinations. So we love these cute baseball cookies. The creator uses a baseball cookie mold, but you can use any circular mold to get the baseball shape. You’ll just have to add the laces with some icing. These sweet and tasty cookies will be a home run at your cookie exchange.
12. Bases-Loaded Baseball Cookies
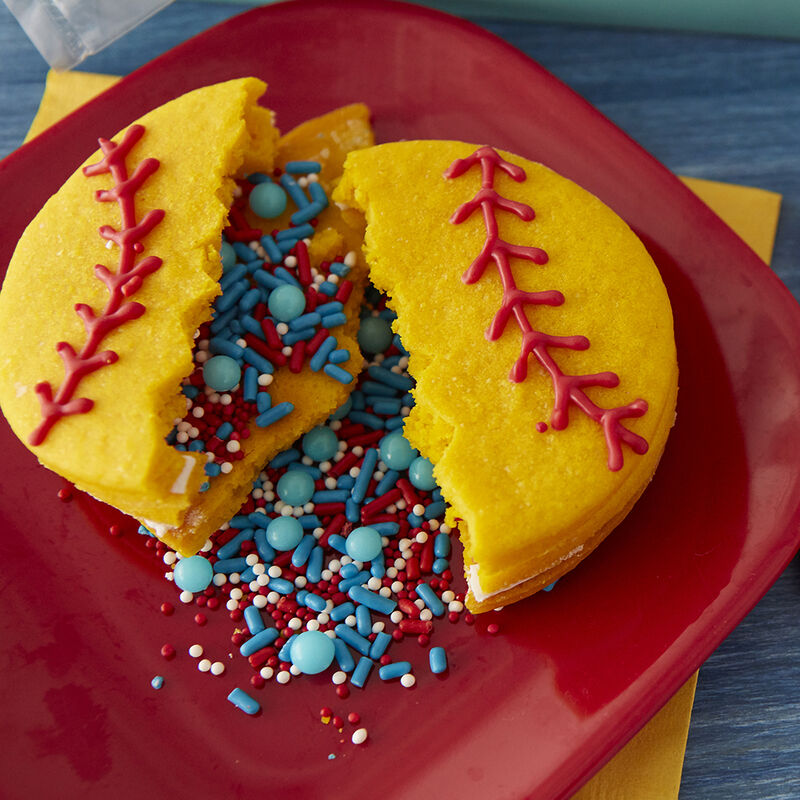
Equipment
- 10 x 16 Chrome-Plated Cooling Rack
- Decorating Bags, 16-Inch Disposable Piping Bags, 12-Count
- Recipe Right Small Non-Stick Baking Sheet, 13.2 x 9.25-Inch
- Double-Sided Round Cut-Outs Set, 6-Piece
- 16-Inch Disposable Decorating Piping Bags, 12-Count
Ingredients
- 1 Oz Lemon Yellow Icing Color
- Red Candy Melts
- White Candy Melts
- 1 Oz Golden Yellow Icing Color
- Roll-Out Cookie Dough
- 3 Oz White Nonpareils
- Sprinkle Assortment
- 5 Oz Blue Sugar Pearls
Instructions
- Make cookies. Prepare Roll-Out Cookie Recipe following recipe. Tint dough yellow. Use smooth side of round Cutter“A” and cut three rounds for each cookie. Use smooth side cutter “C” and cut out the center of one cookie to create aring. Do not bake the center cutout, reroll dough and reuse. Bake and cool cookies.
- Assemble cookies. Melt white Candy Melts candy according to package directions. Place melted candy in decorating bag. Cut small opening. Attach the ring cookie to one solid round cookie using melted candy. In a small bowl mix red, white and blue jimmies and nonpareilstogether. Fill center of each cookie with approx. 1 teaspoon sprinkles decorations. Use melted candy to attach one solid round cookie to ring cookie to seal.
- Decorate cookies. Melt red Candy Melts according to package directions and place in decorating bag. Cut small opening. Pipe baseball stitching on cookies.
Notes
We definitely saved the best for last on this one. These bases-loaded baseball cookies have a fun surprise in the center. Made with stacked cookies, the center is filled with tiny candies. These pinata-style cookies are sure to win over your crowd. You can fill them with anything from sprinkles to chocolate chips. Make sure to make a large batch because these cookies go super quickly.
Whether you are baking for the holidays or just looking for sun sweets to add to your tailgating food lineup, these 12 cookies are sure to be a hit! For more tasty sports-themed recipes, the team at Inside Tailgating has you covered. Be sure to follow us on Facebook, Twitter, Instagram and check out our Amazon Storefront. Let us know which is your favorite in the comments below, or share your favorite recipes and tag us on social media with your amazing creations so we can highlight your recipe in the future.

